How to transfer a tape to a CD using Audacity
NOTE: I originally wrote this article as a reference, after I transferred a cassette tape to a CD using the ahead Nero Wave Editor software. At the time, I was using version 1.0 of the Wave Editor on Windows 98.However, the software I used is now pretty dated, so the new instructions below are for using the free Audacity sound editor on Windows XP. Audacity is also available for older Windows operating systems (back to Windows 98), Mac OS-X, and Linux.
If you want to read the original article, I've archived it at http://www.nsftools.com/misc/TapeToCDNero.htm. You can also find some excellent instructions about converting tapes to CD at cdrfaq.org (this is what I used as my starting point).
Essentially, the process is to hook a cassette tape player up to the sound card on your PC, record the songs/music on the tape to one or more WAV files on the computer, and then transfer the WAV files to a CD. More detailed instructions are below.
Step 1: Connect your tape player to your sound card
If you have a tape player with a "line-out" jack, you should really use that, but you can use the headphone jack in a pinch. Whatever you're using, connect it to the "line-in" plug on the back of your sound card.
Almost every sound card in the world uses 1/8th-inch plugs, although your line-out/headphone jack may or may not be the same size. If it's a different size, converters are pretty easy to find. Also, make sure you're using a cable with stereo plugs -- if there's one little ring around the metal part of the plug it's mono, if there are two little rings it's stereo.
Play a little bit of the tape to make sure the sound is coming out of the PC speakers -- if it is, you've hooked everything up right. NOTE: if you don't hear anything, there's a possibility that your "line-in" volume is just muted. Open up the Windows volume control (Start - Programs - Accessories - Entertainment - Volume Control) and make sure that the line-in isn't muted.
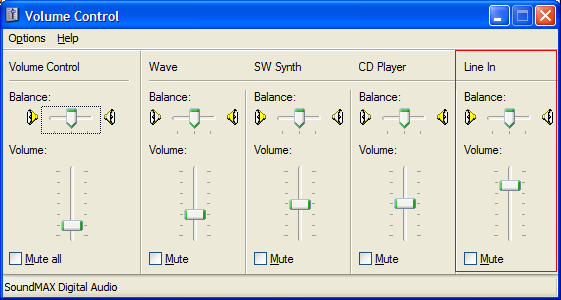
If "line-in" doesn't even show up on the Volume Control, go to Options - Properties, and make sure that "line-in" is one of the volume controls that is checked.
On your tape player, make sure that any of the balance or bass/treble dials are set in the middle, so you'll get a true recording of the music. Also make sure any "bass boost" settings are off, so your final recording isn't muddy.
Step 2: Adjust the input level meter
The theory here is that you want the music/sound from the tape to be recorded as loud as possible without "clipping". Clipping occurs when the louder parts of the recording are above 0 decibels, which "flattens" the tops of the sound waves and ends up making the recording sound flat.
To adjust the input level, connect your cassette tape player to your soundcard (as in step 1 above) and open the Audacity sound editor program (this is a free program available for a number of different operating systems). Make sure that the input selector on the Audacity toolbar is set to "line in", and the volume slider next to it is at least in the middle (if not a little higher).
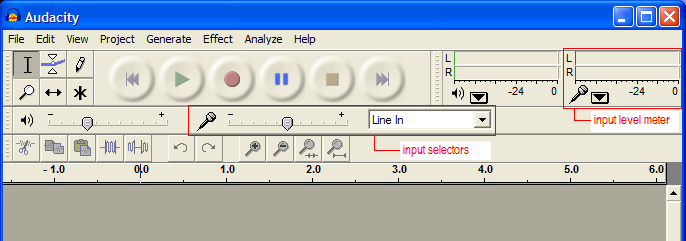
Now start playing the tape, and click the "record" button on the Audacity toolbar (it's the big red circle, right next to the big green triangle). You should hear the sound coming out of your computer speakers, and you should see the input level meter at the top right of the Audacity window moving with the sound.

If you don't hear the sound, check the Windows volume control settings (see step #1 above). If you hear the sound but don't see the input level meter moving, make sure the input selector is set to "line in" and the input volume slider next to it is loud enough.
Once you see the input level meter moving, adjust the volume on the tape player so that the louder parts of the music just barely push the input meter to the far right of the scale (marked with a 0 on the scale). I usually play it safe and make sure they don't quite get to the 0-Db mark.
After everything is adjusted to your liking, click the "stop" button on the Audacity toolbar (the yellow-brown square, two buttons to the right of the "record" button), and close the audio track that began recording as we were setting the volume (either with the menu option File - Close, or by clicking the little "x" at the top right of the audio track display).
Step 3: Record a song
Before you begin, make sure you have enough disk space! An entire side of a cassette tape (all the tracks) will normally create a file between 350 MB and 1 GB in size when using the default recording settings. This means you will want at least 1.5 GB free, to make sure you don't even come close to running out of space.
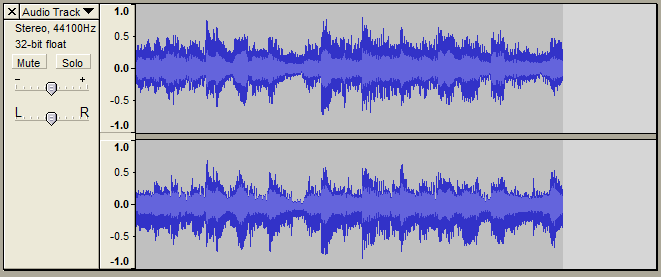
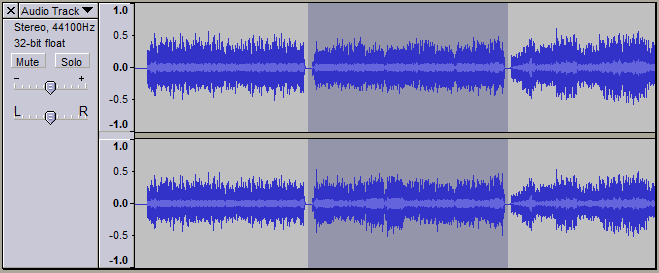
After you have the volume set properly (from step 2 above), rewind to the beginning of the tape, start playing the tape, and click the "record" button on the Audacity toolbar (it's the big red circle, right next to the big green triangle). Don't worry about skipping over the silence at the beginning of the tape -- this will be easy to remove later. You will see the Audio Track display moving along as you're recording.
You can either record the entire side of the tape as a single file, or record individual tracks as separate files. It's up to you. I usually find it easier to record the entire side, clean it up all at once (as in step 4 below), and then save the individual tracks afterwards. It's generally easy to see when the tracks start and end, because there will be silence between tracks.
Keep in mind though, that if your computer doesn't have much memory, it's possible that you'll have problems recording an entire side of a tape at once. I've got a lot of RAM in my machine, and I've never had problems, but your results may vary. Probably the best thing to do is to try to record the entire side at once, and if you have problems then you can back down to recording a single song at a time.
After the song/side is over, click the "stop" button on the Audacity toolbar (the yellow-brown square, two buttons to the right of the "record" button). Then choose the menu option File - Save Project As to save your recorded selection as an Audacity project (*.aud) file.
Step 4: Clean up the tracks
Now that you've recorded and saved the file, you'll want to clean it up a little before you send it to CD. Here's how:
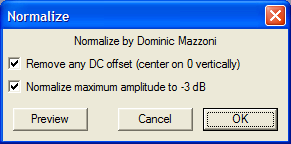
1. Select the entire file (menu option Edit - Select - All) and "Normalize" it by choosing the menu option Effect - Normalize.You should resist the urge to adjust the equalization of the music at this point, because trying to boost the bass or the treble using your PC speakers as a guide may make your final recording sound too bright or too muddy. Burn the music to a CD first (see step 6 below) and test it on a real stereo (or multiple stereos, if you're really particular) before and while you equalize.
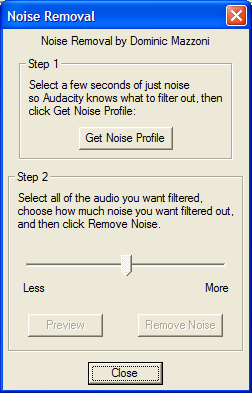
2. Select a small amount of "silence" from the beginning or end of the recording (drag the mouse over the part you want to select), and choose the menu option Effect - Noise Removal. Click the "Get Noise Profile" button.
3. Select the entire recording (Edit - Select - All) and choose the menu option Effect - Noise Removal again. Click the "Remove Noise" button. This should remove a good amount of the tape hiss that came over with the track. Be aware that the noise removal process can take several minutes, so now is a good time to take a little break.
You can adjust the slider bar between the "Less" and "More" settings if you want, but the middle option is normally good enough. You never really want to set the bar all the way to the highest amount of noise removal, because that can create a lot of strange audio artifacts in the track. For a normal tape recorded from a normal recorder, the middle position is usually fine. For an especially "noisy" tape, you may want to go about 3/4 of the way between "Less" and "More".
4. Choose the menu option File - Save to save the file again.
Step 5: Save the individual tracks as WAV files
If you saved the entire side of the cassette tape to a single file in step 3, you will probably want to come back and separate the tracks into individual files. This is actually very easy.
Just open up the recording that you made (if it's not open already) and use the View - Zoom In and View - Zoom Out menu options to see two or three tracks at a time (the tracks will be clusters of sound, separated by thin lines of silence. Drag the mouse over a track to select it, and choose the menu option Edit - Copy. Don't worry if you select a little bit of the track before or after the track you want -- that will be easy to remove after we paste it.
Then choose the menu option File - New to open a new Audacity window, and choose the menu option Edit - Paste. This will create a new audio track with only the selection you copied (be patient, sometimes it takes a few seconds to paste the track).
If you have a small amount of an adjoining track (or a large amount of silence) at the beginning or end of the track you just created, you can just drag the mouse over the part of the track you don't want and press the Delete key on your keyboard to remove it.
When your track is ready, choose the menu option File - Export As WAV to save this track as a WAV file. This is the file format most commonly used when creating an audio CD.
You can then close the new Audacity window (the one with the single track we just saved), and repeat this process for all tracks in the file.
(NOTE: Audacity can also export to MP3 format, but it requires you to install a separate DLL. Please see the Audacity help files for more information.)
Step 6: Burn the WAV files to a CD
Just use your favorite CD-burning software to do this, using the instructions that came with the software. Find all the individual tracks you converted to WAV files in step 5 above, and record the tracks to a CD.
If the equalization doesn't sound quite right (too much bass or treble), you can play around with the equalizer settings in Audacity (menu option Effect - Equalization). Beware that this way can lie madness, however, as you can find yourself equalizing and tweaking and playing with levels for days on end, trying to get the perfect sound.
One other thing to watch out for is that some lower end sound cards have been known to record things from the line-in jack at a slightly different speed than the input sound itself. If you suspect this has happened to your recording (and it bothers you), you can try using the menu Effects "Change Speed", "Change Pitch", and "Change Tempo".
http://www.nsftools.com/misc/TapeToCD.htm